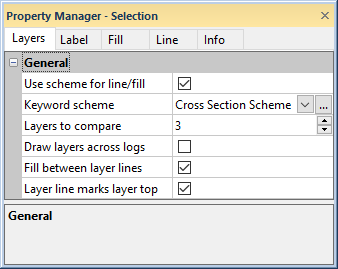
Click on the Layers item in the Object Manager to edit properties for all layers in the cross section. Scheme properties, layer names, layers to compare, line properties, fill properties, and label properties can be edited. The Info tab displays information about the number of layers in the cross section.

Click on the Layers tab in the Property Manager to
load a scheme for the layers in a cross section.
Check the box next to Use Scheme For Line/Fill to use a keyword scheme to determine the line and fill properties for each layer in the cross section. Uncheck the box to set the layer properties using the Line and Fill tabs for all layers at the same time. Or, uncheck the box and set the layer properties for each layer individually.
The Keyword Scheme is the scheme that determines
the fill and line properties when Use
Scheme For Line/Fill is checked and the font properties when Use Scheme For Label Font is checked. The items in the selected scheme
should match the text that appears in the interval or lithology table.
To change the scheme, click on the existing scheme name and select the
desired scheme from the list. Click the  next to
the scheme name to open the Scheme
Editor, where the scheme can be created or edited.
A cross section is created by matching layers between neighboring wells.
Sometimes a layer doesn't have a match in the neighboring borehole and
a pinchout is created. The Layers To
Compare option determines the number of layers from each neighboring
borehole that each layer in a log should examine before a pinchout
is created. The default option is 3. The larger this option is, the less
pinchouts will appear on the cross section, but the more likely that layers
will connect when they should not. To change the number of layers to compare,
highlight the existing value and type the new value. Alternatively, click
the  to increase or decrease
the value. Press ENTER on the keyboard to make the change.
Check the Draw layers across logs check box to draw layer lines horizontally across the width of the logs in the cross section. The Draw layers across logs property is only available for a line/symbol cross section. After importing or creating layer marks, click the check box next to Draw layers across logs and the layer lines will be horizontal across the log or logs for each borehole in the cross section.
After enabling the Draw layers across logs property the layer lines do not automatically update if you make further customizations, such as changing the log width, adding user-created logs, changing the log order, etc. You must uncheck the Draw layers across logs check box and re-check the Draw layers across logs check box to update the layer lines after making log changes.
The layers will be drawn horizontally across user created logs as well, regardless of type. However, logs added with the Log | Create Logs commands must be next to the logs used to create the line/symbol cross section for the layers to be drawn across all logs. That is, the logs from each borehole must be adjacent to one another for the layer lines to be drawn across all logs. There can be space between the logs from the same borehole, but there cannot be a log from a different borehole between the logs. When the user created logs are in a different order than the line/symbol logs, the user created logs are ignored and the layers are only drawn across the original line/symbol logs.
|
|
When Draw layers across logs is not checked a straight line is drawn between layer marks on the line/symbol logs. |
When Draw layers across logs is checked the layer lines are drawn horizontally across the line/symbol logs and any adjacent user created logs with the same Hole ID. |
The Fill between Layer Lines option is only available for a line/symbol cross section. After importing or creating layer marks, check the box next to Fill between Layer Lines to fill the areas between the layer marks. When the box is unchecked, layer lines will appear, but the areas between layer lines will not be filled.
When the Fill between Layer Lines is checked, the fill colors for the layers come from the Keyword Scheme if the Use Scheme For Line/Fill is checked. If the Use Scheme For Line/Fill is unchecked, set the layer properties using the Line and Fill tabs for all layers at the same time or set the layer properties for each layer individually.
The Layer Line Marks Layer Top option controls whether the imported or created layer marks are the location for the layer's top or bottom location. When the box next to Layer Line Marks Layer Top is checked, the layer marks are the top of the layer. When the box is unchecked, the layer marks are the bottom of the layer.
If changing the individual layer line and fill properties or changing the Layers line, fill, or font properties shows no change on the layers in the cross section, a keyword scheme may be in use by the Layers object. To turn off the display of the keyword scheme, click on the Layers object to select it. Click on the Layers tab in the Property Manager. Uncheck the boxes next to Use Scheme for Line/Fill and Use Scheme For Label Font. The layers line, fill, and font properties can now be edited separately.
See Also