Fill properties can be changed for selected objects. To edit the fill properties, click on the object in the Object Manager or plot window. The properties are listed in the Property Manager. Default fill properties are set in the File | Options dialog by clicking on the Fill page.
If the options on the Fill tab are not available, a scheme is likely being used. Uncheck the appropriate Use Keyword Scheme, Use Range Scheme, or Use Indent Keyword Scheme option to turn off the display of the scheme properties and set the fill properties on the Fill tab.
Note that if a scheme is used in a log item, the fill properties will be unavailable on the Fill tab. You must change the fill properties for the scheme in the Scheme Editor or turn off the display of the scheme.
The object's fill is composed of layers of various fill types. All of the predefined fills have only one layer. Custom fills created with the Fill Style Editor may have multiple layers of any type. Each layer in the fill style has its own section in the Property Manager. The layers are listed in descending order, i.e. the topmost layer is listed first, Layer 1 (<type>), followed by additional layers. The following properties are displayed on the Fill page of the Property Manager.
Only the layer properties displayed in the Property Manager are included in this topic. To see information about properties that are included in the Fill Style Editor, see the Fill Style Editor topic. The image layer Load from property and the vector layer drawing area are only available in the Fill Style Editor.
For many of the log objects, the Fill page includes a Fill background check box. If the box next to Fill background is checked, the background area is filled. If the box next to Fill background is unchecked, the background is not filled. To change the Fill background, check or uncheck the box. The Fill Properties section below the Fill background property controls the background fill.
When a legend is selected, the Fill page contains the fill options for the legend background. The Frame style on the Line page must be set to Rectangle or Rounded Rectangle for the legend to display a background fill. When the Frame style is set to None, the background fill is not displayed regardless of the Fill page settings. If you wish to display a background fill but not a frame line, then set the Frame style to Rectangle or Rounded Rectangle. Next set Style in the Line Properties section to Invisible. Finally set the desired background properties on the Fill page.
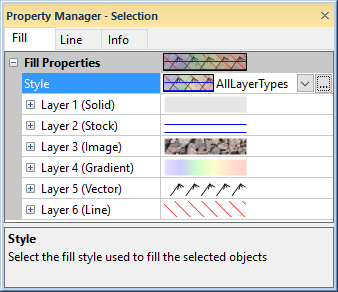
The Fill page in the Property Manager controls the
fill properties for the selected object.
The Style indicates the way
that an object is filled. To change the Style,
click on the existing fill style next to Style.
In the list, select a new style from the fill
palette. Create custom fill styles with the Fill
Style Editor. Click the  next to the Style field to open
the Fill Style Editor to modify
or create a fill style.
next to the Style field to open
the Fill Style Editor to modify
or create a fill style.
Each layer in the selected fill style is displayed in its own section.
The layers are listed in order from top to bottom. The layer name is Layer n (type), where n
is the layer position and type
is the layer type. A layer preview is displayed to the right of the layer
name. The six layer types are Solid,
Stock, Image, Gradient,
Vector, and Line. Click the  button to expand the layer properties.
The properties for a solid layer are Color and Opacity.
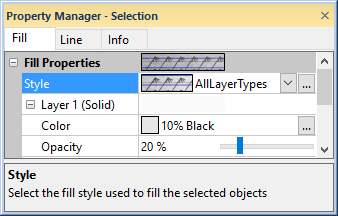
Expand a Solid layer to edit the layer's properties.
The Color is the color
of the solid fill. Click the existing color sample next to Color
to open the color palette. Click on a
color in the palette to use it for the layer's fill color. Click the button to open the Colors
dialog and create custom colors, use the dropper to select a color, or
select the color from a color wheel.
The Opacity controls the transparency
of the solid fill style. To change the Opacity,
highlight the existing value and type a new value. Press ENTER on the
keyboard to make the change. Alternatively, click and drag the slider
 to increase or decrease the opacity value. Opacity values are between
0% (zero opacity, full transparency) to 100% (full opacity, zero transparency).
to increase or decrease the opacity value. Opacity values are between
0% (zero opacity, full transparency) to 100% (full opacity, zero transparency).
The properties for a stock layer are Pattern, Foreground color, Foreground opacity, Background color, and Background opacity.
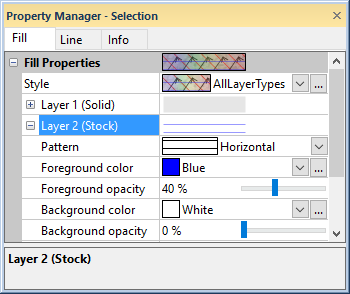
Expand a Stock layer to edit the layer's properties.
The Pattern indicates the way the stock layer is filled. To change the Pattern, click on the existing pattern sample next to Pattern. Select a new style from the pattern palette.
The Foreground color is the
color of the pattern. Click the existing color sample next to Foreground
color to open the color palette.
Click on a color in the palette to use it for the selected foreground
fill color. Click the button
to open the Colors dialog and create custom
colors, use the dropper to select a color, or select the color from a
color wheel.
The Foreground opacity controls
the transparency of the foreground portion of the pattern. To change the
Foreground opacity, highlight
the existing value and type a new value. Press ENTER on the keyboard to
make the change. Alternatively, click and drag the slider to increase or decrease
the opacity value. Opacity values are between 0% (zero opacity, full transparency)
to 100% (full opacity, zero transparency).
The Background color is the
color behind the pattern. Click the existing color sample next to Background color to open the color
palette. Click on a color in the palette to use it for the background
fill color. Click the button to open the
Colors dialog and create custom
colors.
The Background opacity controls
the transparency of the background portion of the pattern. To change the
Background opacity, highlight
the existing value and type a new value. Press ENTER on the keyboard to
make the change. Alternatively, click and drag the slider to increase or decrease
the opacity value. Opacity values are between 0% (zero opacity, full transparency)
to 100% (full opacity, zero transparency).
If the stock layer is above other layers in the fill style, the Background opacity must be less than 100% to see the layers below. To make a fill pattern appear transparent with only the foreground portion of the fill pattern showing, change the Background Opacity value to 0%.
The properties for an image layer are Pattern, Opacity, Stretch, Image Offset (X and Y), and Image Scale (X, Y, and Proportional).
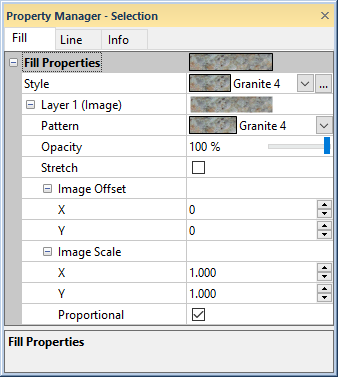
Expand an Image layer to edit the layer's properties.
The Pattern property is used to add image layers from predefined or custom image fill styles. To change the image layer, click the current option for an image layer Pattern and select a predefined image layer or a custom image layer from the image palette. Only image fills with a single layer are included in the image palette.
The Opacity controls the transparency
of the image fill style. To change the Opacity,
highlight the existing value and type a new value. Press ENTER on the
keyboard to make the change. Alternatively, click and drag the slider
to increase or decrease the opacity value. Opacity values are between
0% (zero opacity, full transparency) to 100% (full opacity, zero transparency).
The Stretch is used with image patterns. The Stretch determines how the image is used to fill the desired area. When the Stretch check box is checked, the image is stretched to fit the fill area. When the Stretch check box is not checked the image is tiled in the fill area.
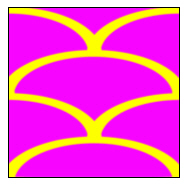
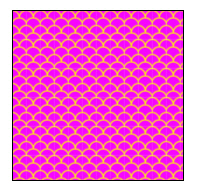
The image fill on the left has the Stretch box checked. The image on
the right has the Stretch box unchecked.
Offset the image in the fill layer by typing a value in pixels in the
X or Y
fields in the Image Offset
section. You can also change the X and
Y image offset values by clicking
the ![]() buttons.
buttons.
The Image Scale properties
control the density of the image fill. Change the image scale by typing
a value in the X or Y
fields in the Image Scale section.
The Image Scale properties are
ignored when the Stretch property
is checked. You can also change the X
and Y image scale values by clicking
the ![]() buttons.
buttons.
When the Proportional check box is checked, the X and Y values automatically update to maintain the current aspect ratio. Uncheck the Proportional check box to apply different scaling in the X and Y directions.
Note that the Proportional property does not lock the X and Y values to any specific aspect ratio but to whichever ratio is in use when the box is checked. For example, assume you want the X:Y ratio to be 2:1, but you do not know which Image Scale values are desired. You can uncheck the Proportional check box. Next set the X value to 2 and the Y value to 1. Check the Proportional check box. Now when you adjust one of the X or Y values, the other value updates automatically to maintain the 2:1 ratio.
The properties for a gradient layer are Type, Direction, and Colormap.
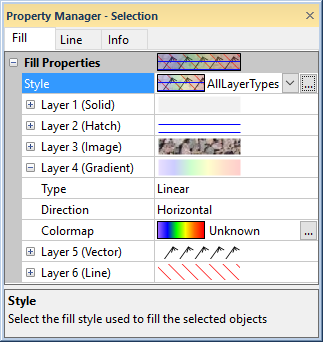
Expand a Gradient layer to edit the layer's properties.
The Type controls how a gradient fill pattern is used to fill the selected area. To change the Type, click on the current type and select the new type in the list. Select Linear or Radial for the Type. When the Type is set to Linear, a linear color gradient fills the area. The colors change in a linear manner from the top to the bottom or from the left to the right of the area. When the Type is set to Radial, a radial color gradient fills the area. The colors change in concentric circles, either expanding from the interior and going out or from the exterior and going in.


The Radial type is shown on the left and
the Linear type is shown on the right.
The Direction option sets the direction the gradient fills. When the Type is set to Linear, choose either Vertical or Horizontal for the Direction. The Vertical option sets the gradient to change along the Y axis. The Horizontal option sets the gradient to change along the X axis. When Radial is selected as the Type, the Direction options are Inward and Outward. This reverses the color direction.
The Colormap option sets the
colors to use in the gradient pattern. Click the
button to select or create a color gradient in the Colormap
dialog.
The properties for a vector layer are Color and Opacity.
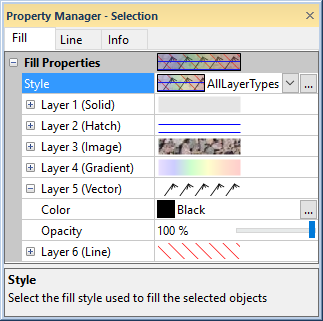
Expand a Vector layer to edit the layer's properties.
The Color is the color
of the lines in the vector fill. Click the existing color sample next
to Color to open the color
palette. Click on a color in the palette to use it for the layer's
line color. Click the button
to open the Colors dialog and create custom
colors, use the dropper to select a color, or select the color from a
color wheel.
The Opacity controls the transparency
of the lines in the vector fill. To change the Opacity,
highlight the existing value and type a new value. Press ENTER on the
keyboard to make the change. Alternatively, click and drag the slider
to increase or decrease the opacity value. Opacity values are between
0% (zero opacity, full transparency) to 100% (full opacity, zero transparency).
The properties for a Line layer are Color, Opacity, Angle, Offset, Separation, and Width.
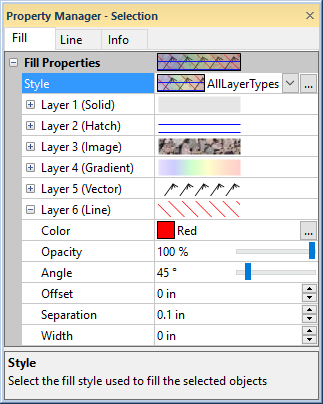
Expand a Line layer to edit the layer's properties.
The Color is the color
of the lines in the line fill layer. Click the existing color sample next
to Color to open the color
palette. Click on a color in the palette to use it for the layer's
line color. Click the button
to open the Colors dialog and create custom
colors, use the dropper to select a color, or select the color from a
color wheel.
The Opacity controls the transparency
of the lines in the line fill layer. To change the Opacity,
highlight the existing value and type a new value. Press ENTER on the
keyboard to make the change. Alternatively, click and drag the slider
to increase or decrease the opacity value. Opacity values are between
0% (zero opacity, full transparency) to 100% (full opacity, zero transparency).
Change the angle of the lines by typing a value in degrees in the Angle field or clicking and dragging
the slider . Positive values rotate the lines clockwise.
Change the vertical offset between the lines and the pattern's origin
by typing a value between -0.25 and 0.25 inches in the Offset
field. You can also change the Offset
value by clicking the ![]() buttons.
buttons.
Change the separation between the lines by typing a value between 0
and 0.25 inches in the Separation field.
You can also change the Separation
value by clicking the ![]() buttons.
buttons.
Change the line Width by highlighting the existing value and
typing a new number or by clicking the ![]() to increase
or decrease the line width. The line width can be zero to 0.5 inches (1.27
cm) wide. A width of zero is one pixel wide.
to increase
or decrease the line width. The line width can be zero to 0.5 inches (1.27
cm) wide. A width of zero is one pixel wide.
See Also