Fill Style Editor
The Fill Style Editor creates
or modifies fill styles. Open the Fill
Style Editor by clicking the  button in the
fill Style field in the Property
Manager or Scheme Editor
or by clicking the New Style or
Modify Style buttons in
the Fill Style Manager. Fill styles created
with the Fill Style Editor can
incorporate multiple Solid, Stock, Image,
Gradient, Vector,
and Line layers.
button in the
fill Style field in the Property
Manager or Scheme Editor
or by clicking the New Style or
Modify Style buttons in
the Fill Style Manager. Fill styles created
with the Fill Style Editor can
incorporate multiple Solid, Stock, Image,
Gradient, Vector,
and Line layers.
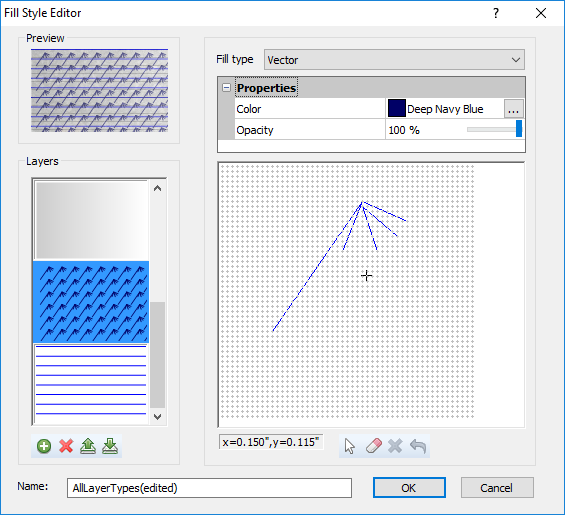
Create and modify fill styles with the Fill
Style Editor.
Preview
The Fill Style Editor includes
a preview image of the fill style. The preview is created from the visible
fill style layers in the Layers
section.
Layers
The Layers section displays
all the layers in the fill style. Click a layer to edit the layer's appearance.
Adding and Removing Layers
Click the  to add a new layer to the fill style.
The selected layer is duplicated when the is clicked.
The new layer appears at the top of the Layers
list. Click the
to add a new layer to the fill style.
The selected layer is duplicated when the is clicked.
The new layer appears at the top of the Layers
list. Click the  to remove the selected layer from
the fill style. Deleting a layer cannot be undone.
to remove the selected layer from
the fill style. Deleting a layer cannot be undone.
Changing Layer Order
Layers are drawn in order from bottom to top of the Layers
list. Therefore the top layer in the Layers
list will be drawn on top of all the other layers. Click the  to move the selected layer
up one position in the list. Click the
to move the selected layer
up one position in the list. Click the  to move the
selected layer down one position in the list.
to move the
selected layer down one position in the list.
Layer Properties
The right side of the Fill Style Editor
contains the layer properties. The displayed properties are determined
by the layer's Fill type. Select
Solid, Stock,
Image, Gradient,
Vector, or Line
from the Fill type list
to specify the layer type. Fill styles can include multiple layers of
any fill type.
Nearly all of the properties in the Fill
Style Editor are displayed in the Property
Manager Fill
page. The explanation for these properties are located in the Fill
Properties help topic. The Image
layer Load from property is only
available in the Fill Style Editor.
The Vector layer drawing area
is only available in the Fill Style Editor.
These properties that are not located in the Property
Manager are explained below.
Load an Image to an Image Layer
Click the File or Clipboard buttons in the Load from field to load an image
file to the fill layer. Click File to
select the image file in the Import
dialog. Click Clipboard to load
the image file that is currently on the clipboard. An error message is
displayed if the clipboard is empty or does not contain image data.
Creating and Editing Vector Layer
Select Vector to apply a custom
vector fill layer to the fill style. The Vector
layer type includes a drawing area in addition to the layer properties.
Draw a pattern in the drawing area to create a vector fill layer.
Drawing Lines
The drawing area is in draw mode and the cursor is a crosshair by default.
Click once in the draw area to begin drawing a line. A line is displayed
in black as it is being drawn. Move the cursor to the desired endpoint
for the line and click once to finish drawing the line. The line is added
to the fill layer and displayed in blue. Continue drawing lines until
the desired pattern is created.
Selecting and Erasing Lines
Quickly erase a single line by double-clicking the line with the drawing
mode cursor (crosshair). If you wish to select the line to ensure you
are deleting the correct line, first click the  button
to enable the select tool. Next click on the desired line. The selected
line is displayed in red. If you wish to remove the selected line, click
the
button
to enable the select tool. Next click on the desired line. The selected
line is displayed in red. If you wish to remove the selected line, click
the  button. The delete button is disabled when no
lines are selected.
button. The delete button is disabled when no
lines are selected.
Clearing the Drawing Area
Click the  button to clear all lines from the drawing
area.
button to clear all lines from the drawing
area.
Undo
Click the  button to undo changes to the drawing
area. There are 10 undo levels in Fill
Style Editor.
button to undo changes to the drawing
area. There are 10 undo levels in Fill
Style Editor.
Saving the Fill Style
Depending on how the Fill Style Editor
was accessed, the bottom of the Fill
Style Editor may contain a Name
property or a Save to Style List button.
When the Fill Style Editor is
opened via the Fill Style Manager New Style or Modify
Style button, enter a name for the custom fill style in the Name field.
When the Fill Style Editor is
opened by clicking the button
in the Property Manager
or Scheme Editor, click the
Save to Style List button to
save the custom fill style. Enter a name for the fill style in the Style Name dialog. Click OK
to save the fill style. Click Cancel
to close the Style Name dialog
without saving the fill style. The default name for the new fill style
is the original fill style name with a number appended to the end. For
example, if the Solid fill style
is modified, Solid 1 is the default
name in the Style Name dialog.
OK and Cancel
When the Fill Style Editor is
opened via the Fill Style Manager, click
the OK button to save the new
or modified fill style with the current Name.
Click Cancel to close the Fill Style Editor without making
changes to the new or modified fill style. The OK
button is disabled if the Name
field is empty or contains only spaces.
When the Fill Style Editor is
opened via the Property Manager,
click the OK button to make the
changes to the fill style for the selected object. These changes are NOT
saved to the fill style, and only apply to the selected object. To save
the changes, click Save to Style List
in the Fill Style Editor and give
the style a new name in the Style Name
dialog. You cannot overwrite existing styles with this method. To make
changes to existing fill styles, use the Fill
Style Manager. Click Cancel
to close the Fill Style Editor
without making any changes to the selected object's fill.
See Also
Fill Style Manager
Fill Properties
Line Properties
Property Manager