 in the title
bar of the Property Manager
to close it.
in the title
bar of the Property Manager
to close it.The Property Manager allows you to edit the properties of an object. See the specific online help topic for the object you have selected for more information on the properties unique to that object.
The Property Manager
is opened and closed with the View | Managers | Property command.
You can also click in the title
bar of the Property Manager
to close it.
Click the appropriate tab to open pages in the tab view.
In both tab and horizontal views, individual sections can be expanded
or collapsed. A  or
or  is located to the left of the name if the section can be expanded or collapsed.
To expand the section, click the , click
the section name and press the plus key ( + ) on the numeric keypad, or
press the right arrow key on your keyboard. To collapse a section, click
the , click the section name
and press the minus key ( - ) on the numeric keypad, or press the left
arrow key.
is located to the left of the name if the section can be expanded or collapsed.
To expand the section, click the , click
the section name and press the plus key ( + ) on the numeric keypad, or
press the right arrow key on your keyboard. To collapse a section, click
the , click the section name
and press the minus key ( - ) on the numeric keypad, or press the left
arrow key.
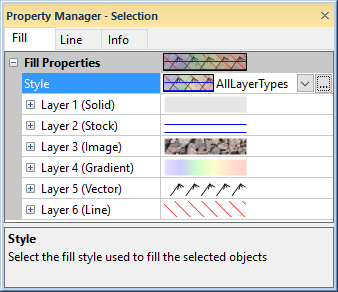
To display an area with field hints check the Show property manager info area check box in the Options dialog User Interface page. When a field or label is selected a hint describing the function or type of data is displayed:
Right-click and select Display info area to show hints about
the currently highlighted field in the Property Manager.
When working with the Property Manager the up and down ARROW keys move up and down in the Property Manager list. The ENTER key activates the highlighted property. The right arrow key expands collapsed sections (i.e. Fill Properties) and the left arrow collapses the section.
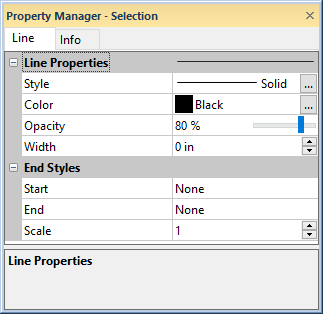
The Property Manager displays the properties for selected objects. For example, this selected well selector line has Style, Color, Foreground Opacity, Width, Start Style, End Style, and Scale properties.
Change any of the properties for
the object in the Property Manager.
To change a property, click the property's value and
select a new property from the pop-up box, scroll to a new number using
the ![]() buttons, or type new numbers or text. The method
used to change a property depends on the property type. In the polyline
example, changing the color requires clicking the current color
box and selecting a new color from the color
palette; changing the width requires typing a new number or scrolling
to a new number. When you type the new number, press ENTER or click
somewhere in the Property Manager
to make the change permanent.
buttons, or type new numbers or text. The method
used to change a property depends on the property type. In the polyline
example, changing the color requires clicking the current color
box and selecting a new color from the color
palette; changing the width requires typing a new number or scrolling
to a new number. When you type the new number, press ENTER or click
somewhere in the Property Manager
to make the change permanent.
Occasionally, some properties are dependent on other selections. For example, in the fill properties there is a Scale option. This option is disabled (grayed out) unless you have selected an image fill type as the Pattern and Cover Areas By set to Tile.
If multiple objects are selected, only features common to all objects appear in the Property Manager.
To change the default line, fill, symbol, or text properties for all borehole views and all sessions of Strater, use File | Options.
See Also