Once a map view exists, wells can be connected for creation of a cross section. Wells are selected in the order that they should appear in the cross section. The first selected well will be on the left of the cross section, and the last well in the well selector will be the furthest right well in the cross section.
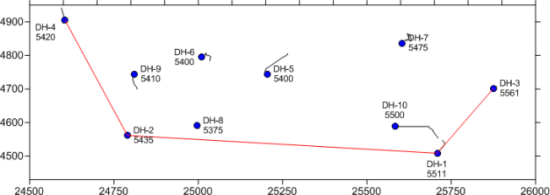
The well selector appears as a red line on the above map.
To connect wells,
Click the Wells map layer.
Click the Map | Add | Well Selector command or right-click on an existing map and choose Add | Well Selector.
The
cursor changes to  . As the cursor approaches
a well, the well name appears in a floating box. This makes selecting
the right well easier. Click on the first well to select it. In the
map above, this would be well DH-4.
. As the cursor approaches
a well, the well name appears in a floating box. This makes selecting
the right well easier. Click on the first well to select it. In the
map above, this would be well DH-4.
Click on each additional well. The order the wells are selected is the order that the logs will appear in the cross section. The order the wells were selected above would be DH-2, DH-1, and finally DH-3.
After the last well is selected, press the ENTER key on the keyboard or double-click on the last well to end the current well selector line.
Press
ESC on the keyboard or the  button to
end selector mode.
button to
end selector mode.
The well selector is displayed on the map as a line and in the Object Manager as a line with the names of the selected wells. The wells are listed in the name of the line in the order the wells are selected.
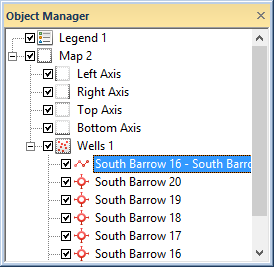
The well selector object is shown in the
Object Manager as a line with the name
displaying the order of the selected wells .
Each well selector can be used to create a new cross section, so multiple well selector lines can be added to the same map view. To add the next well selector, follow the steps above again. Strater allows an unlimited number of well selector lines to be in a single map view.
See Also