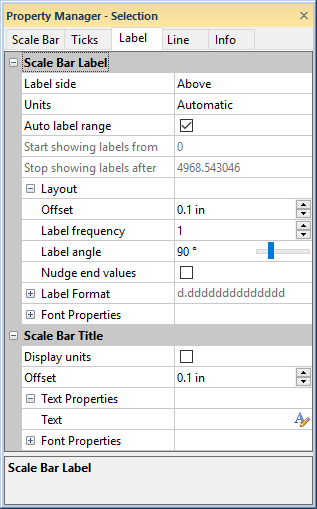
The Label page in the Property Manager includes options for setting the label side, units, and label range for the ticks on a scale bar. To view and edit scale bar label properties, click on the scale bar in the view window or Object Manager to select the scale bar. Then, click on the Label tab in the Property Manager.
Set label properties on the Label
tab in the Property Manager.
The Label side changes the location of the ticks and labels from above the scale bar (the default location) to below the scale bar. Normally, when the scale bar appears in the footer, the Label side is set to Below and when the scale bar appears in the header, the Label side is set to Above. To change the label side, click on the existing option and select the desired option from the list.
The Units option is available when the Scale Bar Scale type is set to Cross Section. The Units option controls the tick mark values displayed on the cross section scale bar. To change the units, click on the existing option and select the desired option from the list. Setting the Units to Automatic reads the units from the coordinate system of the map in the associated map view.
If the units are not specified for the Map, the Column units from the Easting and Northing column are used. If the units are different in these columns, the Easting column is used. If only one of the Easting or Northing column has units, that column's units are used. When the column units are not recognized, conversion between units is not done properly.
Check the box next to Auto label range to have the starting and stopping labels set to the starting and ending tick marks. When unchecked, the Start showing labels from and Stop showing labels after options become available.
When the Auto label range is unchecked, the Start showing labels from option lists the first tick value on the scale bar that should contain a label. To change the first label value, uncheck the Auto label range option. Then, highlight the number next to showing labels from and type the desired starting label value. Press ENTER on the keyboard to make the change. The label value is specified in the Units for a cross section scale bar or in the units displayed on the Ticks tab for a log or user defined scale bar.
When the Auto label range is unchecked, the Stop showing labels after option lists the last tick value on the scale bar that should contain a label. To change the last label value, uncheck the Auto label range option. Then, highlight the number next to Stop showing labels after and type the desired ending label value. Press ENTER on the keyboard to make the change. The label value is specified in the Units for a cross section scale bar or in the units displayed on the Ticks tab for a log or user defined scale bar.
Click the  next to Layout
to set the label layout options.
next to Layout
to set the label layout options.
The Offset moves the label
numbers up (positive offset) or down (negative offset). To change the
offset, highlight the existing value and type a new value. Press ENTER
on the keyboard to make the change. Alternatively, click the ![]() to increase or decrease
the offset. Numbers are in page units and range from -2 to 2 inches (-5.08
to 5.08 centimeters).
to increase or decrease
the offset. Numbers are in page units and range from -2 to 2 inches (-5.08
to 5.08 centimeters).
The Label frequency option
controls how many major labels appear on the scale bar. Setting the value
to zero displays no labels on the scale bar. Setting the value to one
displays a label at all major tick mark values. Change the Label
frequency to two to display a label at every other value or three
to display a label at every third value. To change the Label
frequency, highlight the existing value and type a new number.
Enter a number between 0 and 200. Press ENTER on the keyboard to
make the change. Alternatively, click on the ![]() to increase
or decrease the value.
to increase
or decrease the value.
The Label angle option sets the displayed data at an angle. The numbers are in degrees offset from horizontal moving in a counter-clockwise direction. For example, an angle of 90 displays the numbers vertically, and an angle of 180 displays the numbers upside-down.
The Nudge end values option moves the starting and ending labels away from the edges of the log pane so that they are completely visible. This 'nudging' occurs only if the label is near the edge of the log pane, otherwise the location of the label does not change.
Click the next to Label
Format to open the label
format section.
Click the next to Font
Properties to open the font
properties section.
The Scale Bar Title section
of the Label page contains the
text and font properties for the scale bar title. Click the  button to expand the Scale Bar Title section.
Check the box next to Display units to display the units below the scale bar title. The units display uses the same font properties as the scale bar title. The scale bar units are specified by the column properties for the table and column in use by the linked log item. This is the linked variable column for line/symbol and function logs, Data column for bar logs, Keyword column for tadpole logs, and the Curve 1 Data column for crossplot logs.
Type the scale bar title text into the Text
field to set the scale bar title. Math
text instructions can be included in the Text
field. Click the  button to add or edit the text with
the Text Editor.
button to add or edit the text with
the Text Editor.
Click the next to Font
Properties to open the font
properties section. The font properties apply to the entire scale
bar title. Use the Text Editor
to apply different styles, sizes, and colors to the scale bar title text.
See Also