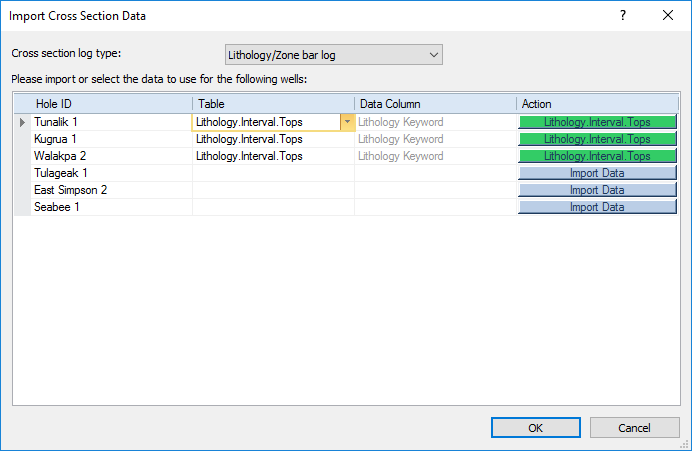
The Import Cross Section Data dialog appears when creating a cross section. This dialog allows you to set the type of cross section to create and set the table and data column for each log in the cross section. To open the Import Cross Section Data dialog, click the Cross Section | Create/Add | Create Cross Section command. Click through the dialogs and the Import Cross Section Data dialog will appear.

Set the type of cross section, tables, and data columns for each well in the
Import Cross Section Data dialog.
To change the type of cross section created, click on the existing option in the Cross section log type list. Select the type of cross section desired. Available options are Lithology/Zone bar log, Line/Symbol log, or Depth-registered raster log. When Lithology/Zone bar log is selected, either zone bar logs or lithology logs are created, based on the type of table selected.
To assign data to a borehole, click on the existing table name and click the down arrow button to the right of the Table name. Any open table that can create either the lithology/zone bar logs or line/symbol logs are listed. Select the appropriate table and the Table option updates to show the selected table. If no tables are listed, a new data file must be opened.

Click on the arrow to the right of the
table name to select a different table.
To change the data that the borehole displays in the log, click on the existing column name and click the down arrow button to the right of the Data Column name. All available columns are listed. Select the appropriate column and the Data Column option updates to show the selected column. If no columns are listed, select a different Table or open a new data file.
If a table is not listed, a new table needs to be opened in the project.
Click the  button. In the Import Data dialog,
select the appropriate data file and click Open.
Step through the data import options dialogs. When the table is imported,
it will be listed under the Table
column, if the table type matches the type needed for the log type.
A cross section cannot be created unless all boreholes are associated with a table. If you do not have data for a borehole in the well selector and wish to continue creating the cross section, you can remove a borehole from the Import Cross Section Data dialog by clicking the Hole ID and pressing DELETE. Once the cross section is created the Well selectors field in the Cross Section properties contains the original well selector. You cannot recreate the cross section while the data is missing for boreholes in the well selector. You can create a new well selector and update the Well selectors property in the cross section properties, or you can add the data for the missing wells to the project if you wish to recreate the cross section.
When all boreholes have a Table and Data Column listed, click OK to display the cross section. If a lithology/zone bar log cross section is created, the logs and connected layers are displayed. If a line/symbol log cross section or depth-registered raster log cross section is created, the logs are displayed without connected layers.
Click Cancel to cancel the creation of the cross section. The map and well selector line will still be created.
See Also