Scheme Editor
Use the Scheme Editor to create
or modify the contents of a scheme. To open the Scheme
Editor:
Click the Home |
Display | Scheme Editor command.
Select an object that uses a scheme. In the Property Manager, click in the scheme
selection field and click the  button.
Select a column or cell in a table. Right-click and
select Create Scheme, or click the Table
| Create Scheme command. Click OK
in the New Scheme dialog and the Scheme Editor appears.
Scheme Editor Dialog
The Scheme Editor is divided
into two sections. On the left is a hierarchical menu with all scheme
types, schemes, and items in schemes. On the right are the properties
for the selected scheme item.
The Scheme Editor
allows users to create, load, modify, and save a scheme.
Scheme Editor - Schemes List
The Scheme Editor schemes list
is displayed on the left side of the dialog. It contains a list of all
of the schemes loaded into the current project.
Each scheme type is indicated by the folder icon. To expand a scheme
type section, click the  , or select the
scheme type name and press the RIGHT ARROW or + key on the keyboard. To
collapse a scheme type, click the
, or select the
scheme type name and press the RIGHT ARROW or + key on the keyboard. To
collapse a scheme type, click the  , or select
the scheme type name and press the LEFT ARROW or - key on the keyboard.
, or select
the scheme type name and press the LEFT ARROW or - key on the keyboard.
Each scheme has an icon indicating the type of scheme, either keyword,
lithology keyword, indent keyword, range, or well construction. Click
the to expand a scheme and
see the scheme items. Click the to collapse
the scheme.
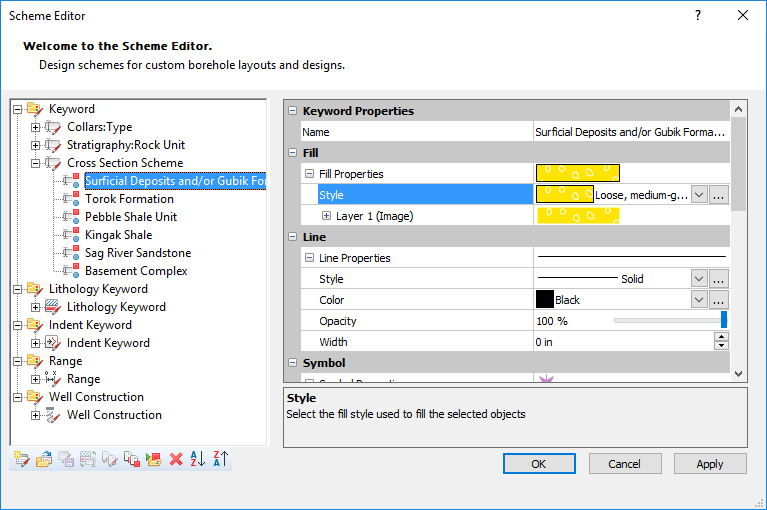
Scheme items are the individual parts of a scheme. In the Cross
Section Scheme above, there are six scheme items. Each represents
a range of lithology type values. The Surficial
Deposits and/or Gubik Formation scheme item is selected, as indicated
by the blue highlight surrounding the item name. When a scheme item is
selected on the left side of the Scheme
Editor, the properties for that item are displayed in the right
side.
There is no limit to the number of items a scheme can have.
Scheme Item Properties
The properties for a selected scheme item are displayed on the right
side of the Scheme Editor.
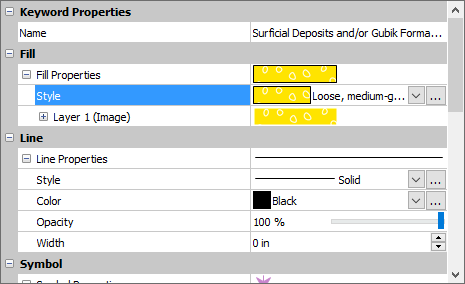
The properties are displayed on the right side of the
Scheme Editor.
The available properties vary depending upon the scheme type being edited.
Many scheme items have line,
fill, symbol,
font, and contact
line properties. Additionally, schemes have specific scheme type options:
Keyword, Lithology
Keyword, Indent
Keyword, Range,
and Well
Item properties. Use the additional scheme item properties to rename
the scheme item or define the range for that item.
Scheme Editor Tools
The buttons  at the bottom of the scheme editor provide additional tools for the user
when editing schemes and scheme items.
at the bottom of the scheme editor provide additional tools for the user
when editing schemes and scheme items.
Creating New Schemes
To create a new scheme, click the  button. The
New Scheme dialog
opens, where you define scheme properties such as the type of scheme and
the number of scheme items. New schemes created in this way can be based
on column data by selecting Base Scheme
on Column Data. This ensures that the data matches the text in
the selected table view.
button. The
New Scheme dialog
opens, where you define scheme properties such as the type of scheme and
the number of scheme items. New schemes created in this way can be based
on column data by selecting Base Scheme
on Column Data. This ensures that the data matches the text in
the selected table view.
Opening Schemes
Click the  button to open a Strater
Scheme .SCH File. Scheme files are created by saving an existing scheme.
Several sample schemes are saved in the Strater
Samples directory, which is located at C:\Program Files\Golden Software\Strater
5\Samples, by default. Several sample scheme files are located in the
Samples directory and can be opened into any project. Once a scheme is
opened, it appears in the appropriate scheme type section.
button to open a Strater
Scheme .SCH File. Scheme files are created by saving an existing scheme.
Several sample schemes are saved in the Strater
Samples directory, which is located at C:\Program Files\Golden Software\Strater
5\Samples, by default. Several sample scheme files are located in the
Samples directory and can be opened into any project. Once a scheme is
opened, it appears in the appropriate scheme type section.
Saving Schemes
To reuse schemes with other projects or to share schemes with colleagues,
save the scheme. Click on the scheme name and click the  button. The Scheme
Files dialog appears. Type a File
name and click Save. The
scheme is saved as a Strater
Scheme .SCH File. The .SCH file can then be used with any other Strater project by selecting the
.SCH file after clicking the
button at the bottom of the Scheme Editor.
button. The Scheme
Files dialog appears. Type a File
name and click Save. The
scheme is saved as a Strater
Scheme .SCH File. The .SCH file can then be used with any other Strater project by selecting the
.SCH file after clicking the
button at the bottom of the Scheme Editor.
If the button is not available, a scheme name is
not selected.
Converting Schemes
Click the  button to convert
a lithology keyword scheme to a keyword scheme or a keyword scheme to
a lithology keyword scheme. This button is only available when a lithology
keyword or keyword scheme is selected. Highlight the scheme to convert
and click the button. This is useful if you wish to reuse schemes for
different log types without the necessity of recreating complex schemes.
button to convert
a lithology keyword scheme to a keyword scheme or a keyword scheme to
a lithology keyword scheme. This button is only available when a lithology
keyword or keyword scheme is selected. Highlight the scheme to convert
and click the button. This is useful if you wish to reuse schemes for
different log types without the necessity of recreating complex schemes.
For example, if you created a zone bar log, a keyword scheme is created.
You can design the keyword scheme exactly how you want it to appear. To
use the same scheme item names and properties with a lithology log,
Click
on the keyword scheme to select it.
Click
the  button to copy the keyword scheme. A duplicate
keyword scheme is created.
button to copy the keyword scheme. A duplicate
keyword scheme is created.
With
the duplicate scheme selected, click the button.
The
duplicate scheme is converted to a lithology keyword scheme and moved
under the Lithology Keyword
scheme type list. The lithology keyword scheme is created
with the same properties as the keyword scheme.
If the
button is not available, a keyword or lithology keyword scheme is not
selected. Click on the appropriate keyword or lithology keyword scheme
name to convert the scheme.
Copying Schemes
You can copy a scheme by selecting a scheme name and clicking the button. A duplicate of the scheme appears in the scheme
type list. You can edit the copy of the scheme, including the scheme name
and scheme item properties.
If the button is not available, a scheme is not
currently selected.
Copying Scheme Items
Scheme items can be copied by clicking on the scheme item and clicking
the  button. A new scheme
item with the name New Item will
appear. All of the properties from the original scheme item are copied.
Edit the new item properties on the right side of the scheme editor.
button. A new scheme
item with the name New Item will
appear. All of the properties from the original scheme item are copied.
Edit the new item properties on the right side of the scheme editor.
Creating New Scheme Items
To create a new scheme item in a scheme, select the scheme name or an
existing item within the scheme and click the  button.
The item will appear labeled as New
Item. Edit the new item properties on the right side of the scheme
editor.
button.
The item will appear labeled as New
Item. Edit the new item properties on the right side of the scheme
editor.
Deleting Schemes
To delete a scheme, select the scheme name and click the  button or press DELETE on the keyboard. If the button
is not available a scheme or scheme item is not currently selected.
button or press DELETE on the keyboard. If the button
is not available a scheme or scheme item is not currently selected.
Deleting Scheme Items
To delete an item in a scheme, click on the scheme item to be deleted
and click the button or press
DELETE on the keyboard. If the button is
not available a scheme or scheme item is not currently selected.
To order scheme items automatically, click on any scheme item in the
scheme. Clicking the  button to order the scheme items
in ascending order or click the
button to order the scheme items
in ascending order or click the  button
to order the scheme items in descending order. Refer to the Sort
page for information on the order that is used for sorting.
button
to order the scheme items in descending order. Refer to the Sort
page for information on the order that is used for sorting.
To manually order scheme items, click on the scheme item name. Hold
down the left mouse button and drag the scheme item to the desired position.
The cursor changes to  if the object can be moved to
the position. The cursor changes to
if the object can be moved to
the position. The cursor changes to  if the scheme item cannot be moved to the position. Scheme items can be
dragged anywhere in the existing scheme or to another scheme of the same
scheme type.
if the scheme item cannot be moved to the position. Scheme items can be
dragged anywhere in the existing scheme or to another scheme of the same
scheme type.
Updating Schemes
After making any edits to a scheme, click the Apply button
to apply the changes to the current view window. Click OK
to make the change in the view window and close the Scheme Editor. Click
Cancel to return to the
view window without making the change.
Undoing Scheme Changes
Click OK to
close the Scheme Editor.
Click the Home | Undo | Undo command to
undo all changes that were made in the Scheme
Editor from the time the Apply
button was last clicked until the OK
button was clicked. If the Apply
button was clicked multiple times, you may need to click
Home | Undo | Undo multiple
times to undo all of the changes that were made in the Scheme
Editor.
See Also
Create
Schemes
New Schemes
Table
Types
Update
Borehole Data
Bar
Log
Classed
Post Log
Complex
Text Log
Lithology
Log
Percentage
Log
Post
Log
Well
Construction Log
Zone
Bar Log