In the Create Well Selector dialog or Well Selector Editor dialog, wells can be rearranged, added, and deleted from the well selector line. The Create Well Selector dialog appears when creating a cross section. The Well Selector Editor dialog appears when editing a well selector line from a map view.
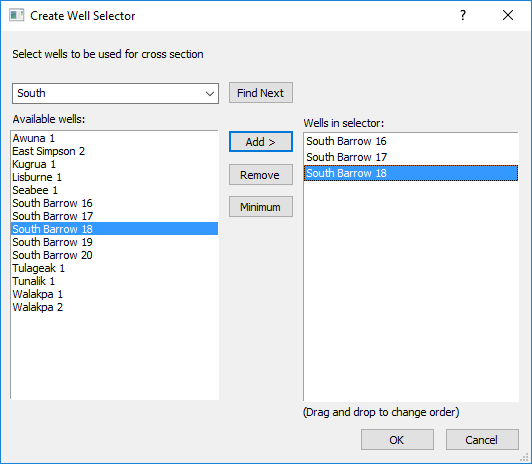
The left side contains a list of all available wells in the map.
The right side contains a list of wells in the current well selector.
The Create Well Selector or Well Selector Editor dialog contains a search box to quickly locate wells. Start typing a well name in the Search available wells box, and the first match will be highlighted in the Available wells list. Click Find Next to move the selection to the next matching well name. The search is not case sensitive.
The search string must match the beginning of the well name. The search will not return results for intermediate matching characters. Using the image above for example, if South is typed into the Search available wells box, the South Barrow 16 well is selected in the Available wells list. Clicking Find Next will move the selection to South Barrow 17, then South Barrow 18, etc. However, if Barrow is typed into the Search available wells box, no matching wells are found.
The search string does not need to be a complete word. Again using the image above as an example, if tu is typed in the Search available wells box, the Tulageak 1 well is selected in the Available wells list. Clicking Find Next moves the selection to Tunalik 1.
An asterisk (*) can be appended to the end of the search string to select all matching results. Using the image above as an example, if South* is typed in the Search available wells box, the South Barrow 16, South Barrow 17, South Barrow 18, South Barrow 19, and South Barrow 20 wells are all selected.
Click the ![]() to open a list of previous search terms.
Click Find Next to add a search
string to the previous searches list. Up to ten search terms are saved
in the list.
to open a list of previous search terms.
Click Find Next to add a search
string to the previous searches list. Up to ten search terms are saved
in the list.
To add wells, open the Create Well
Selector or Well Selector Editor
dialog. Click on the well name that should be added in the Available
wells list. To select multiple wells that are not located above or below
other wells in the list, press and hold the CTRL key on the keyboard.
Click and select each well to add multiple wells. To select multiple wells
that are located above or below other wells, click the first well, press
and hold the SHIFT key on the keyboard, and press the last well. All
wells between the first and last are selected. Once all wells are selected,
click the  button. The selected
wells are added to the bottom of the list of Wells
in selector list. Click OK
when all of the wells are in the Wells
in selector list and the well selector line updates.
button. The selected
wells are added to the bottom of the list of Wells
in selector list. Click OK
when all of the wells are in the Wells
in selector list and the well selector line updates.
A well can be added to the Create Well Selector or Well Selector Editor more than once. However, two adjacent wells cannot have the same hole ID. That is, the well cannot be next to itself in the list.
To modify the order the wells in the well selector are connected, open
the Well Selector Editor dialog.
On the right side of the dialog in the Wells
in selector list, change the wells so that the wells
are in the order they should appear in the cross section. To move wells,
click on the well to move, hold down the left mouse button, and drag the
well to the desired location. A  indicates
a location where the well can be moved. a
indicates
a location where the well can be moved. a  appears
in a location where the selected well cannot be moved. Click OK
when all of the wells are in the proper order and the well selector line
updates.
appears
in a location where the selected well cannot be moved. Click OK
when all of the wells are in the proper order and the well selector line
updates.
To delete wells from the well selector, open the Well
Selector Editor dialog. Click on the well to be removed in the
Wells in selector list. Click
the  button and the selected
well is removed from the list. Click OK
and the well selector line is updated to not include the deleted wells.
button and the selected
well is removed from the list. Click OK
and the well selector line is updated to not include the deleted wells.
To remove all wells but the top two, click the  button. After clicking the Minimum
button, all wells except for the top two are removed from the Wells
in selector list. This is a quick way to recreate the well selector
line or delete multiple wells at once.
button. After clicking the Minimum
button, all wells except for the top two are removed from the Wells
in selector list. This is a quick way to recreate the well selector
line or delete multiple wells at once.
See Also