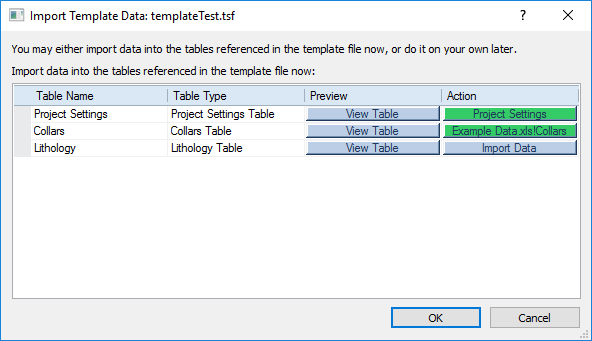
The template wizard loads a full project template into the current project. To use the template wizard, click the Home | Template | Load command. Select a full project template file in the Open dialog. Alternatively, right-click in the View Manager and select Load Template, or click the File | Open command and select a project template file. After loading the view windows and creating the table layout, the Import Template Data dialog appears, prompting for the data files to import into the new tables.
If all of the necessary tables are already open in the project, the Import Template Data dialog is not displayed.

Import new data into each table in the Import Template Data dialog.
The Table Name column lists the name of each table created by the template.
The Table Type column lists
each table's type created by
the template. This tells the user what type of data should be loaded into
each table.
With Strater 1 templates, Unknown will appear in the Table Type list, as Strater 1 did not record the type of table needed for templates.
Click the View Table button next to each table to see the columns created by the template. After clicking the View Table button, the Columns In Table dialog opens. All columns created by the template for the selected table are listed in the dialog.
When the Action button is blue and includes the Import Data text, no data is associated with the selected table. Click the Import Data button to open the Import Data dialog. To import the selected file into the template created table, check the Import data into current table box in the Import Data dialog. Click Open and step through the data import process. The imported data will be included in the selected table.
When the Action button is green, the text will indicate the table name (and sheet for an Excel file), that is being imported into the selected table.
If data exists in other tables, leave the Import Data button and click OK. No data is imported into the selected table. The table can be deleted and the logs referenced to other existing tables.
Click OK to load the data into the selected tables. Click Cancel to create the tables with no data imported.
See Also