Many users have data in external tables (such as .XLS) that they want to import into Strater to be used in logs. Use the following information to make this importing process as easy as possible.
Strater data tables have specific requirements for column names and types of data in columns, and each log type has required columns that must be present in order for Strater to even recognize the table as usable for a particular log type.
In some cases, the external data is not formatted in a manner usable by Strater. However, the data importing process includes dialog boxes that allow you to modify and adjust the data being imported to conform with the data table requirements.
Strater assumes that the first row is the default location for column header information. If a imported data table does not include this information you can add it during the import process or edit the row number for the row containing the header. Column header labels are not required, but do make working with data easier.
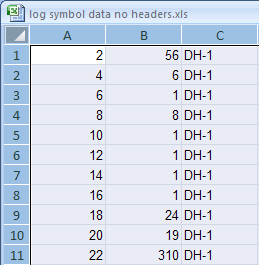
As an example, the following is a data table that does not include header column information:
Strater can use data tables that do
not have column header information.
There is usable data in this table, but because the columns are not labeled you can add the column headers during the import function:
Click the Log | Create Log | Line/Symbol command.
Click inside the log pane to fix the position where a line/symbol log will be displayed.
The Open dialog is displayed. Navigate to the location of the file to open, click on the file name to select it, and click Open.
The Specify Worksheet Column Definitions dialog opens. Note the content of the Column Name field:

The Specify Worksheet Column Definitions dialog allows
you to name each column in an imported data table.
Enter a name for the first column in the Column Name field.
Click a cell in column 2, which changes the contents of the Column Name field.
Enter the name for column 2 in the Column Name field.
Repeat this process for Column 3.
Do not click the Specify Column Header Row check box because the actual column header is not in a table row.
Click Next.
In the Specify Data Type and Column Positions dialog, link the data columns and click Finish. The data appears in the table, ready to use.
Each log type has specific required columns of data that must appear in a specific location in the table. As an example, the Hole ID column is always in the first (far left) position in the Strater data tables.
You can specify which column of data in the data file corresponds to the required column in the data table. Strater will then change the location of the columns to match the position you specified during the import process.
Let us use as an example an Excel spreadsheet data table, such as the one below:
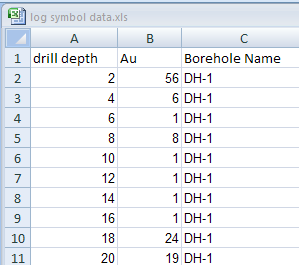
You can import from .XLS files even if the columns are not
named or placed in accordance with Strater default values.
All the required columns (Hole ID, Depth) are present for a line/symbol log, but they are named differently and not in the default order.
To import into Strater for a line/symbol log:
Click the Log | Create Log | Line/Symbol command.
Click inside the log pane to fix the position where a line/symbol log will be displayed.
The Open dialog is displayed. Navigate to the location of the file to import, highlight the file and click Open.
The Specify Worksheet Column Definitions dialog opens. Click the Specify Column Header Row check box because the column header information (Drill Depth, Au, Borehole Name) is in row 1, which is the default row for header information.
Click Next. The Specify Data Type and Column Positions dialog opens:
Note that the contents of the Hole ID and Depth fields are incorrect. They display the column names associated with the default positions for these two required data columns. Because the columns of the imported .XLS file has these required columns in different locations you must change these two fields.
Use the drop-down menus to select the appropriate columns for Hole ID and Depth:
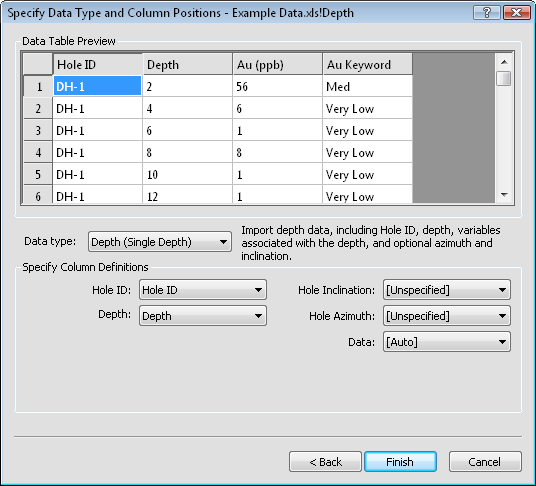
Change the required column definitions to match the column locations in the imported data table.
Click Finish. The log is correctly displayed.
Click the Sheet1 tab. Note that the names of the required columns have changed from their names in the imported .XLS file. In addition, their positions have changed:

The required column names will always appear as
the default names, even when the source data has
different names for these columns.
By using this technique you can adapt data files in Strater without having to go into the source data file location and make edits in the original file. As long as the required data is present in columns, you can make the necessary adjustments during the data importing process.
See Also