To add the layers, you can either click on each log at the top or bottom of each layer or you can import a table of top or bottom values.
Since the USGS already determined the top values for several layers in each of these logs, we will import the layer tops.
Click on the Cross Section object in the Object Manager to select it.
Click on the Cross Section | Layer Marks | Import command.
In the Import Layer Marks dialog, select the LAS Collars.xlsx file.
Select the Tops sheet and click OK.
In the Specify Worksheet Column Definitions dialog, check the Specify Column Header Row box and click Next.
In the Specify Data Type and Column Positions dialog,
Set the Data type to Depth (Single Depth).
Set the Hole ID to WELL NAME.
Set the Depth to DEPTH, feet.
Click Finish.
In the Select Layer Mark Column dialog, select ROCK UNIT as the Column Name and click OK.
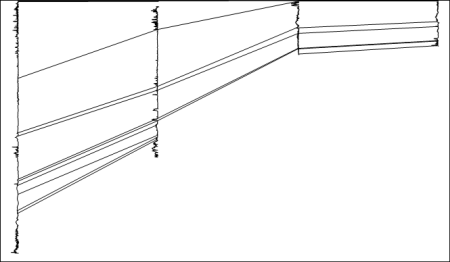
Click Yes in the warning dialog and the layer lines are displayed.
The logs are connected with the layer marks from the Tops table.
To fill the layers, a scheme will need to be created and the layer fill property will need to be activated.
Click the Home | Display | Scheme Editor command.
Click
the  button at the bottom of the Scheme
Editor dialog.
button at the bottom of the Scheme
Editor dialog.
In the New Scheme dialog,
Select Base Scheme on Column Data.
Set the Table Name to Tops.
Set the Column Name to ROCK UNIT.
Type a name for the scheme, such as Cross Section Units.
Click OK.
Click
the  next to the new scheme
name.
next to the new scheme
name.
Click on each scheme item and set the properties for that layer on the right side of the dialog.
Click OK to exit the Scheme Editor.
Click on the Layers object in the Object Manager.
In the Property Manager, click on the Layers tab.
Next to Keyword Scheme, click on the existing scheme name and select the Cross Section Units scheme from the list.
Check the box next to Fill between Layer Lines to fill the layers with color.
Click Yes in the warning dialog and the layers are filled with the colors, as determined by the scheme.
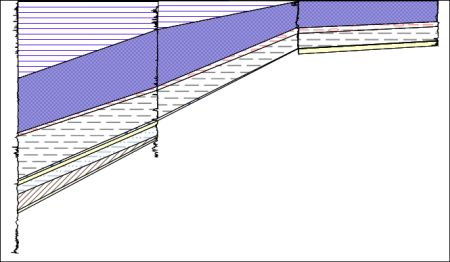
The layers are filled with the information from the scheme.
Back to Creating the Cross Section
Next to Advanced Lesson 13 - Displaying Deviated Maps and Cross Sections