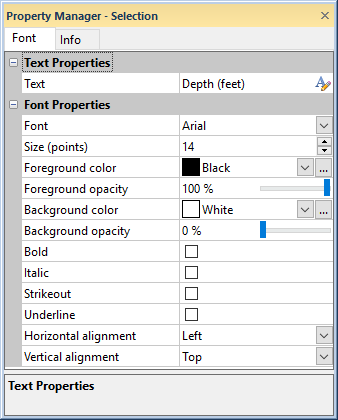
Font properties can be changed for most text objects, including labels. The Font page is displayed in the Property Manager for text objects. Use the following options to change the text values.
Click on the Font tab in the Property Manager
to set the text and font properties for drawn text.
Click the  next to Text to open the Text
section. You can set the text that appears by highlighting the existing
text next to Text and typing
the desired text. The ENTER key on the keyboard can be used to create
multiple lines of text. Click anywhere else in the Property
Manager for the change to be displayed in the view window.
next to Text to open the Text
section. You can set the text that appears by highlighting the existing
text next to Text and typing
the desired text. The ENTER key on the keyboard can be used to create
multiple lines of text. Click anywhere else in the Property
Manager for the change to be displayed in the view window.
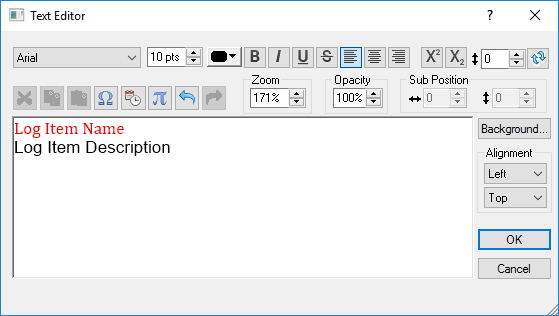
For text that uses different font properties for some characters, click
the  button next to Text.
The Text Editor opens, allowing each
character to have different properties.
button next to Text.
The Text Editor opens, allowing each
character to have different properties.
When an object has the Text
section, the changes made in the Font
section are considered the baseline text properties and are applied to
each line of a text block. Changes made here override "normal"
font options in the Text Editor. To have
all text the same, click the button. Highlight
all the text and set all the properties in the Text
Editor, as desired. Then, the changes in the Font
section will apply to all text in the text object.
For example, suppose you type the following in the Text Editor. After typing the text, you have highlighted the first line and made the color red and font Cambria.
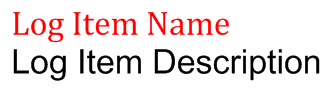
After clicking OK in the Text Editor, the following appears in the Text section of the Property Manager: Log Item Name\n \black \f"Arial" Log Item Description. The two lines of text would appear in the view window as:
Now, in the Property Manager in the Font section, set the Font to "Calibri", the Foreground Color to Blue, and set the Bold and Italic to Yes. Because the second line contains a font name and color, the font and color will not change. But, the first line will change to blue and Calibri.

If the second line of text should remain without any text embellishments, such as bold or italics, in the Property Manager, click before the Log Item Description text and add a \plain math text option. This does not control the font name and color, so they will change. The Text field in the Property Manager would appear as: Log Item Name\n \black \f"Arial" \plain Log Item Description
And, the text would appear in the view window as:

Use the Font option to change the font for the text. All TrueType fonts are listed in the font list. to change the font, click on the existing option and select the desired font from the list.
Set the text size in the Size (points)
field by scrolling to a new number using the  or by
highlighting the existing value and typing a number into the box. Sizes
are in points.
or by
highlighting the existing value and typing a number into the box. Sizes
are in points.
Change the Foreground Color of the text by clicking on the color box. Select a new color by clicking on a color in the color palette. You can create new colors by clicking the Custom button at the bottom of the color palette.
Use the
Foreground Opacity
to change the opacity of the text.
0% is completely transparent and 100% is completely opaque. To change
the value, highlight the existing value and type a new value or click
the
to increase or decrease the value.
Use Background to change the color fill of a background rectangle that surrounds the text. Click the color box and select from the palette or click Custom to select a custom color.
Use Background
Opacity to change the opacity of the background. 0% is completely
transparent and 100% is completely opaque. To change the value, highlight
the existing value and type a new value or click the to increase or decrease
the value.
In most places text options will appear in the Property Manager. In these case, check the box next to the Bold, Italic, Underline, and Strikethrough options to apply one or more of those text styles. Note that some typefaces, such as Symbol, do not support bold or italicized text.
Use Horizontal Alignment to place text horizontally in the selected object.
Left horizontally aligns the text box so that the reference point is to the left of the text box.
Center horizontally centers the text box on the reference point.
Right horizontally aligns the text box so that the reference point is to the right of the text box.
Use Vertical Alignment to place default text vertically in the selected object. The reference point for alignment is the exact center of the object.
Top vertically aligns the text box so that the reference point is above the text box.
Center vertically centers the text box on the reference point.
Baseline vertically aligns the text box so that the reference point is located at the base of the text. The baseline is the imaginary line along which characters are positioned as they are drawn. Descenders on characters are drawn below the baseline.
Bottom vertically aligns the text box so that the reference point is below the text box.
See Also