Import Data Into Current Table
Data can be imported into an existing table by clicking the File | Import Data command. In the Import Data dialog, select the data file and click Open. The Specify Worksheet Column Definitions dialog opens. Select the column header row and the starting and ending rows to import and click Next. The Import Data Into Current Table dialog is used to assign imported data into the current table columns.
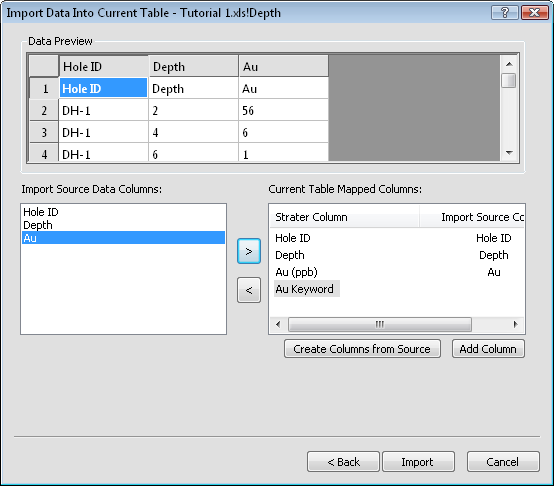
Use the Import Data Into Current Table dialog to map the columns of data in
the source file to the appropriate column in the existing data table.
The Data Preview section displays the data contents of the file to import.
The Import Source Data Columns has a list of all column in the file being imported.
The Current Table Mapped Columns shows columns in the current table and the data that will be imported into those columns. If the new data columns have the same names as the current table columns, the columns are automatically mapped to each other. For example, if the current table contains a Hole ID column and the data being imported contains a Hole ID column, these columns are automatically mapped to one another and the ID data are imported into the Hole ID column.
If the imported data columns and current table columns do not match or if you do not want a column mapped to a existing column, you can manually map the columns.
To map columns:
Highlight a data table column name in the Strater Column list on the right.
Highlight the corresponding column name in the Import Source Data Columns list on the left.
To map these columns click
the  button or double-click the column name in the Import
Source Data Columns list.
button or double-click the column name in the Import
Source Data Columns list.
To remove column mapping:
Click the column name in the Strater Column list you wish to remove.
Click the  button and the imported data column is removed from the Strater
Column list.
button and the imported data column is removed from the Strater
Column list.
If there are columns in the Import Source Data Columns that are not present in the existing table you can add columns to the table and import into these new columns.
Click Create Columns from Source to add all columns in the source data that do not exist in the existing Strater table.
Click Add Column to open the Append Column dialog. In the dialog, create a new column by defining a Column Name, Column Description, and Column Units. Once an added column is defined it can be mapped as described in the Mapping Columns section above.
Click the Back button to return to the previous dialog. Click the Import button to finish the importing process. The data is displayed in the selected table. Click Cancel to cancel the importing process.
See Also