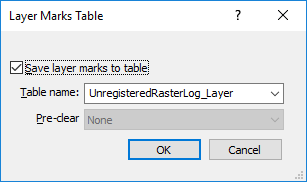
The Layer Marks Table dialog appears after pressing ENTER on the keyboard when creating or editing cross section layer marks or raster log layer marks. The Layer Marks Table dialog is also displayed after changing the depth registration for a raster log.
Select the table name from the list or type any
table name in the box to create a new table.
Check the box next to Save layer marks to table to save the manual layer marks to a table. This is useful if you want to edit the mark locations or import into other cross sections. Uncheck the box to not store the cross section layer marks in a table. Strater will internally save the locations of the marks.
Click on the existing Table name to select an existing table from the list. Alternatively, type any new table name in the box to save the layer marks to a new table.
Select a Pre-clear option to specify which, if any, content to remove from the existing table and replace it with the current layer mark locations. The Pre-clear option is enabled when the Table name matches the name of an existing table.
Select None to append the layer mark information to the end of the existing table.
Select Table to overwrite the entire table with the new layer mark information.
Select Rows with... to overwrite only rows matching hole IDs.
When all changes are made, click OK to save the changes. To quit without saving, click Cancel.
See Also