 button, or press
CTRL+P on the keyboard to print the current contents of the workspace.
If a data table is active, the data table will be printed.
button, or press
CTRL+P on the keyboard to print the current contents of the workspace.
If a data table is active, the data table will be printed.Click the
File | Print command, click the  button, or press
CTRL+P on the keyboard to print the current contents of the workspace.
If a data table is active, the data table will be printed.
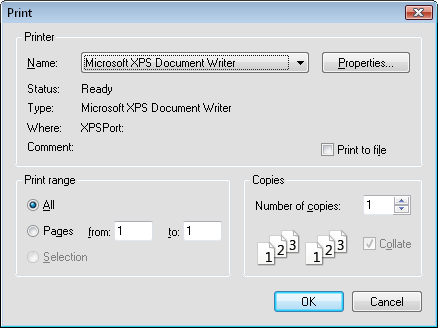
The File | Print command in the table view opens the Print dialog.

The Print dialog controls the printer settings when printing a table.
The Printer options specify which printer to use and displays general information on the selected printer.
The default printer is listed in the Name field. If more than one printer is installed on the computer, use the down arrow to the right of the name field to select a different printer.
The Properties button controls the printer settings. For information on specific printer settings, see the owner's manual for the printer.
Check the box next to the Print to file option to print the data to a .PRN file. .PRN files are ASCII text files. When this option is checked, click OK in the Print dialog after setting other printing options. The Print to File dialog will open. Enter a path and file name in the Print to File dialog and click Save to create the file.
The Print range options control how the pages are printed.
Copies specify the number of copies to print. If two or more copies of multiple page documents are printed, check the Collate box to separate the copies into packets. These options are disabled if the current printer does not support them.
Check the Collate box to collate the pages when multiple page documents are printed two or more times.
See Also