Open the view window.
Click the View
| Display | View Properties command or click the  button.
Set the Depth Units to the data's depth units in the Property Manager.
Depth logs are used as scale bars to display the depth or elevation of the data in the view window. You can include multiple depth logs with multiple units in your borehole graphics. For example, you may want to include a depth log with feet and another depth log with meters.
First, set the project data units so Strater has a basis to perform the conversions.
To set the data units:
Open the view window.
Click the View
| Display | View Properties command or click the
button.
Set the Depth Units to the data's depth units in the Property Manager.
Once the base units are set, you can create the first depth log. To create a depth log:
Click
the Log | Create Log | Depth command or click the  button.
Click in the log pane where you want the depth log to appear.
If there are no other logs in the log pane, you are prompted to import data.
Click on the depth log in the Object Manager or view window, if it is not already selected.
Edit the depth log Display Units in the Property Manager. If, for example, you want one scale bar in feet then set the Display Units to Feet.
To display the labels and ticks on the left side of the log, change the Display Side to Left.
The second depth log is created just like the first depth log:
Click
the Log | Create Log | Depth command or click the button.
Click in the log pane where you want the depth log to appear.
Select the depth log if it is not already selected.
Edit the depth log Display Units in the Property Manager. If, for example, you want one scale bar in meters then set the Display Units to Meters.
Position the depth logs by dragging them to a new location or by setting the position in the Position/Size toolbar. The following directions show how to position a depth log on the left side of the borehole.
To position the depth log:
Click once on the depth log to select it.
Hold down the left mouse button and drag the depth log to the desired location at the far left side of the page. Release the mouse button when the log is in the desired position.
Alternatively, in the Position/Size toolbar, highlight the value next to X: and type the desired value. In the default borehole view, the furthest left an object can be placed is at the page margin which is 0.25 inches, by default. Type 0.25 and press ENTER on the keyboard.
The depth logs can be automatically spaced after setting the first depth log's position. To automatically space the depth logs on the left side of the page:
Click on the first depth log name in the Object Manager.
Press and hold the CTRL key on your keyboard.
Click on the second depth log name in the Object Manager. Both names are highlighted.
Click the Arrange
| Space Objects | Right to Left command or click the  button. This aligns the right depth log bounding box edge to the right
side of the left depth log bounding box edge.
button. This aligns the right depth log bounding box edge to the right
side of the left depth log bounding box edge.
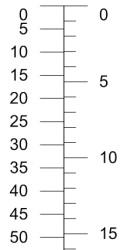
Different scales can be
displayed on two adjacent logs.
The depth log line appears with feet on one side and meters on the other.
See Also