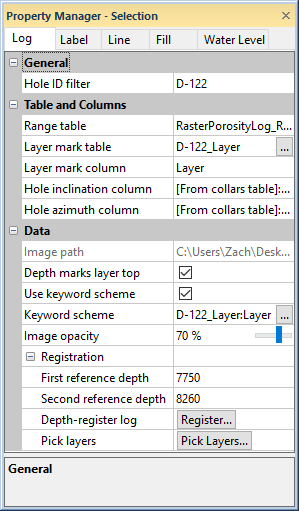
Access the properties for a raster log by clicking the raster log in the borehole view or Object Manager. Next click the Log tab in the Property Manager. The Log properties control the general, table, and data properties of the raster log.
Edit the raster log properties on the Log page of the
Property Manager.
The General section of the Log page contains the Hole ID filter property. Select the borehole you wish to display by clicking the current hole ID and selecting the desired hole ID from the Hole ID filter list. The image and depth-registration will automatically update to the new borehole. If the selected borehole does not have data in a range table, the log will be empty.
The Table and Columns section of the Log page contains the table and column specifications for the location of the log data.
Specify the Range table for the raster log in the Range table field. To change the Range table, click the current selection and select a new Range table from the list. The range table is created upon depth-registration of an unregistered raster log or during import and creation of a registered raster log.
The Layer marks from table only field is visible when viewing the raster log properties from the cross section view. Check the Layer marks from table only check box to only display layer marks added to the layer marks table manually or via the Pick Layers command in the Log page. Table marks manually added to the cross section will not be visible when Layer marks from table only is checked. When Layer marks from table only is not checked, the layer marks added with the Create/Edit command are visible on the cross section.
Specify the Layer mark table for the raster log in the Layer mark table field. To change the Layer mark table, click the current selection and select a new Layer mark table from the list. The layer mark table may be imported with the registered raster log or created by adding layer marks to the raster log.
Specify the column with the layer mark data in the layer mark table in the Layer mark column field. To change the Layer mark column, click the current selection and select a column from the list.
Specify the column with the hole inclination data in the range or other table in the Hole inclination column field. To change the Hole inclination column, click the current selection and select a column from the list.
Specify the column with the hole azimuth data in the range or other table in the Hole azimuth column field. To change the Hole azimuth column, click the current selection and select a column from the list.
The Data section contains options for the raster log appearance, depth-registration, and layer marks.
The Image path property displays the image path for the raster log.
The Depth marks layer top check box indicates if the layer marks are at the layer top. The Depth marks layer top property is only available in the borehole view. Check the Depth marks layer top check box if the layer marks coincide with the layer tops. Uncheck the Depth marks layer top check box if the layer marks coincide with the layer bottoms.
Check the Use keyword scheme check box to use a keyword scheme to link the layer fill properties to the Keyword scheme properties. When the Use keyword scheme check box is not checked, all layers use the same fill properties selected on the Fill page.
Specify the keyword
scheme for the layer fill and line properties in the Keyword
scheme list. The Use keyword
scheme check box must be checked for the Keyword
scheme to be applied to the layer properties. Click the current
selection in the list and select the desired scheme. Click the  button to open the Scheme
Editor and add or modify the Keyword
scheme.
button to open the Scheme
Editor and add or modify the Keyword
scheme.
Control the raster log image opacity with the Image opacity property. Type a value between 0% (fully transparent) and 100% (fully opaque) in the Image opacity field or click and drag the slider to change the Image opacity value. The layer fills are drawn beneath the raster log. Therefore the opacity must be less than 100% to see the layer fills. The default Image opacity is 70%.
When depth registering a raster log, two reference depths must be selected. The First reference depth specifies the depth of the Reference Depth 1 arrow during depth registration. To change the First reference depth value, type the desired value in the First reference depth field and press ENTER. The First reference depth value can be changed while in depth-registration mode.
When depth registering a raster log, two reference depths must be selected. The Second reference depth specifies the depth of the Reference Depth 2 arrow during depth registration. To change the Second reference depth value, type the desired value in the Second reference depth field and press ENTER. The Second reference depth value can be changed while in depth-registration mode.
Click the Register button in the Depth-register log field to change the depth registration of the raster log. See Depth Registering a Raster Log for a more information on the depth-registration process.
Click the Pick Layers button in the Pick layers field to add or change the layers in the raster log. See Adding Layer Marks to a Raster Log for more information on adding, editing, and removing layer marks.
See Also