The Function Log dialog contains the options needed to set the mathematical functions combining multiple line/symbol and bar logs in the view window.
Set the Log Variables, the Operator, and the Functions in the Function Log dialog.
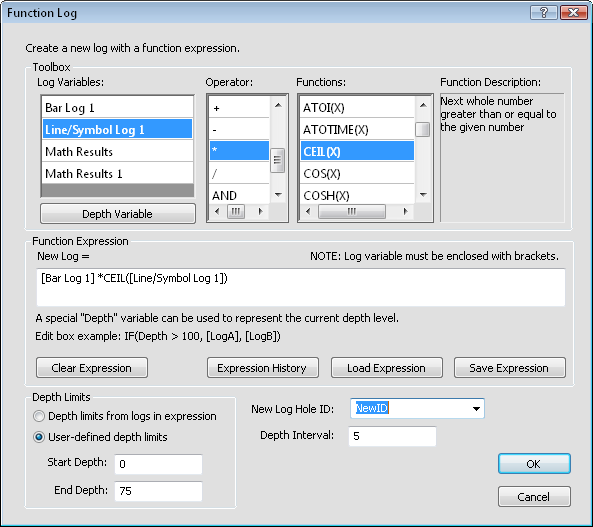
The Log Variables section includes all of the line/symbol and bar logs included in the current view window. If logs exist in other view windows, the function log must be created in that window. To add a log to the expression, double-click on the log name in the Log Variables list. The log name is added at the cursor location in the Function Expression. To use the depth value in the function, click the  button. The Depth is added to the Function Expression.
If no logs are listed or if the data that you want to use is not in the Log Variables section, click Cancel. Create line/symbol or bar logs from the data that should be combined into the function log. Once all variables are defined as a line/symbol or bar log, click the Log | Create Log | Function command again.
Each log can use a different borehole ID or a different table.
The Operator list contains the mathematical values that can be used in the Function Expression. To add an operator to the function, double-click on the symbol. The symbol is added to the Function Expression in the location where the cursor is located. Available operators are equal (=), not equal (<>), greater than (>), less than (<), greater than or equal to (>=), less than or equal to (<=), addition (+), subtraction (-), multiplication (*), division (/), and the logical operators AND, OR, and NOT. AND means that the result is true if the options on both sides of the AND are true. OR means that the result is true if the options on either side of the OR are true. NOT means that the if both sides of the NOT are true, the result is false.
The Functions list contains the list of mathematical functions that can be used in the Function Expression. To determine what a function does, click on the function name. The explanation is included in the Function Description section. To add a function to the expression, double click on the function. The function is added to the Function Expression in the location where the cursor is located.
The X, Y, and Z in the Functions should be changed to either a number of a log name in the Function Expression. For instance, if you want to take the base 10 logarithm of Log A, you would type LOG10([Log A]) in the Function Expression. Note that the log name needs to be enclosed in brackets.
The Function Expression is the location where the function being used to create the new log is displayed. Log variables must be enclosed in brackets in the Function Expression.
Some rules for function expressions may make it easier to input new functions:
Log names must be included in brackets. For instance, if you are adding Log A and Log B, you would type the expression [Log A] + [Log B].
When using the Depth Variable, the word Depth should not be included in brackets. For instance, if you are multiplying Log A times Depth, you would type the expression Depth*[Log A].
IF functions can be used in the Function Expression with the format IF(condition, if_true, if_false). For instance, if you want to use the Log A value for depths less than 50 feet and the Log B value for depths greater than 50 feet, you would type the expression IF(Depth < 50, [Log A], [Log B]).
Depth values are interpolated at the Depth Interval specified for the new log.
Click the Clear Expression button to remove all text from the Function Expression box.
Click the Expression History button to open the Expression History dialog. This contains a list of the most recent expression functions that have been used. To reuse a function, double-click on the expression. Click OK or Cancel to close the Expression History dialog.
If an expression has been saved to a Log Math Expression File (*.lme), it can be reloaded into the current function expression by clicking the Load Expression button. After clicking the Load Expression dialog, select the .LME file from the Open dialog and click Open. The equation appears in the Function Expression box.
To save an expression, type the expression into the Function Expression box. Click the Save Expression button. In the Save As dialog, type a File name and click Save. The file is saved for future use as a Log Math Expression File (*.lme). The expression in the file can be used by loading the expression with the Load Expression button.
The .LME file is an ASCII file that contains the name of the expression and the equation used for the expression. This file can be edited in any text editor program, such as Windows Notepad.
The Depth Limits section determines how the minimum and maximum values are set for the new log. When Depth limits from logs in expression is selected, all of the logs used in the Function Expression are examined. The new log minimum value is the smallest minimum value off all logs used in the expression. The new log maximum value is the largest maximum value of all logs used in the expression. When User-defined depth limits is selected, the Start Depth and End Depth options become available. Highlight the existing values and type the desired minimum value in the Start Depth and maximum value in the End Depth. Data outside this range will be ignored when creating the new log.
Any log can be used in the current view window to create the function log. This means that logs with different borehole IDs can be combined. So, the function log creates a new borehole ID for the function that is created. If [Auto Assigned] is selected, the table and function will use a borehole named NewID. Alternatively, you can click on [Auto Assigned] and select one of the borehole IDs from the list. If all logs use the same borehole ID, only that borehole is listed in the New Log Hole ID list. To use a specific new name, highlight the existing text and type the desired name in the box.
The Depth Interval is the interval that the new function log data will have between depth values. The first value is specified by the Start Depth. The next value will be the Start Depth + Depth Interval, and so on until the last End Depth value is reached. By default, the Depth Interval is calculated by:
The interval used in the Log Variables, if the interval is the same for all selected logs.
The maximum evenly spaced interval used for all of the Log Variables if the interval is different for all Log Variables,
A value of 10 is used if none of the Log Variables selected are evenly spaced in the original data files, or
A value of 10 is used if no Log Variables are used in the Function Expression.
Data from the log variables are interpolated to get the values at the desired depth intervals, if the log data does not fall on the value. To calculate the interpolated values for the log variables, the data value before and data value after each depth point is evaluated using a linear interpolation. This creates a temporary uniformed depth point for each log. Once the data are on the appropriate interval, the Function Expression is applied.
Click OK to create the new Math Results table and new line/symbol log based on the math results. Click Cancel to exit the Function Log dialog without creating the new log and data.
If an error message is displayed, the function in the Function Expression resulted in no data. Click OK in the error message. Click the Log | Create Log | Function Log command and click on the screen. In the Function Log dialog, click the Expression History button. Double-click on the expression at the top of the list. The expression is added to the Function Expression box. Check the Depth Limits, and the Depth Interval to ensure that these values are set correctly for the logs specified. If an error occurs again, check the logs to make sure that data is displayed for each log in the Function Expression.
To create a new function log that is based on existing data, but altered by a constant value or mathematical equation, follow these steps. This could also be done in the data table with the Data | Data | Transform command.
Click the Log | Create Log | Function command or click the  button.
Click inside the log pane where you want the function log to appear.
The Function Log dialog appears.
Double-click on the log name. The log name is added to the Function Expression.
In the Function Expression box, type the remainder of the equation. For instance, if you double-clicked on Log A, and you want the arccosine of the log, type ACOS( before the [Log A] text and ) after the Log A text. The Function Expression should look like ACOS([Log A]).
Click OK and the new Math Results table is created and the log appears in the view window.
To create a new function based on multiple logs of data, follow these steps:
Click the Log | Create Log | Function command or click the button.
Click inside the log pane where you want the function log to appear.
The Function Log dialog appears.
Double-click on the first log name. The log name is added to the Function Expression.
Double-click on any Operator or Function in the lists.
Place the cursor in the desired location in the Function Expression and double-click on the second log name.
Type any additional part of the equation. For instance, if you want to add the logarithmic value of Log A and the square root value of Log B, the Function Expression should look like LOG10([Log A]) + SQRT([Log B]).
Click OK and the new Math Results table is created and the log appears in the view window.
See Also