The File | Export | LAS command creates an LAS file from the selected line/symbol, bar, crossplot, percentage, tadpole, or classed post log. The LAS file follows the LAS 2 format, so it is compatible with most programs.
To use the Export to LAS command,
Select the log to export. Multiple logs can be selected and exported to the same LAS file as long as all of the selected logs use the same Hole ID and all selected logs are one of the supported log types.
Click the File | Export | LAS command.
The Save As dialog is displayed with the Save as type automatically set to LAS Files. Type a File name and click Save.
If the logs in the view window are not linked to tables and columns that contain data, an error message appears after typing a name in the Save As dialog and clicking Save. Click OK on the error. Set all of the logs to a table and column that contain data and click the File | Export | LAS command again.
After typing a File name and clicking Save, the LAS Export dialog appears.
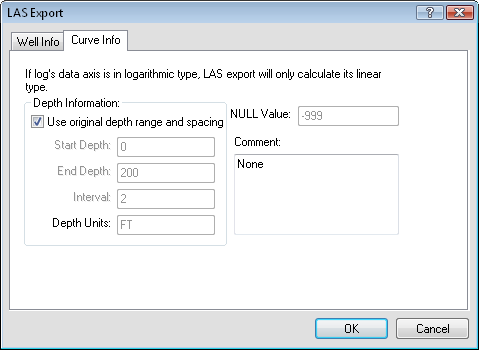
Fill in the depth information and any comments on the Curve Info page.
Strater automatically determines the Start Depth, End Depth, Interval, and Depth Units for the log being exported. Most of the time, these values are the same as those in the View Properties. You can overwrite these values to any values desired. If any columns used to display the curves have units assigned, the units are written to the LAS file. Check the Use original depth range and spacing option to export all logs with the Start Depth, End Depth, and Interval values the same as the original data. Uncheck this box to manually set the values to any desired values.
The Start Depth is the first value being exported to the LAS file. The default value is the Starting Borehole Depth for the selected borehole view or the original starting depth in the table associated with the log. To change the value in the LAS file, highlight the existing value and type the desired value.
The End Depth is the last value being exported to the LAS file. The default value is the Ending Borehole Depth for the selected borehole view or the original ending depth in the table associated with the log. To change the value in the LAS file, highlight the existing value and type the desired value.
The Interval is the spacing for the depth values in the exported LAS file. One measurement will be recorded at each Interval. To change the Interval, highlight the existing value and type a new value.
With multiple logs, Strater examines all of the selected logs and finds each log's maximum increment value. If a log has identical increment values (i.e., maximum increment value is the same as minimum increment value), then the increment value from the first such log found is used as the initial Interval. If the increment values are not identical for a log, then the maximum increment of this log is compared with those of other logs, and the maximum increment value among all logs is selected as the initial Interval.
The Depth Units is the units for the depth log. The value is determined by the Depth Units in the View Properties. This option cannot be changed in the export process. To change the option, cancel the export, change the Depth Units on the View tab in the Property Manager and reexport the file.
The NULL Value is the value in the log that should be used to indicate that the value is not recorded. This is the NULL of the project, as shown on the View tab in the Property Manager.
Enter any comments in the Comments section. These are added to the top of the LAS file.
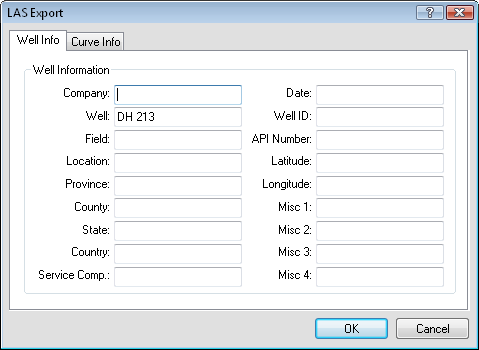
Set the options for the well on the Well Info page.
Enter the company name in the box next to Company. This is an optional entry and does not need to be input.
The Well name is automatically entered from the Hole ID Filter for the selected log. To change the Well, highlight the existing text and type the desired well name. This is an optional entry and does not need to be input.
Enter the field name in the box next to Field. This is an optional entry and does not need to be input.
Enter the location name in the box next to Location. This is an optional entry and does not need to be input.
Enter the province name in the box next to Province. This is an optional entry and does not need to be input.
Enter the county name in the box next to County. This is an optional entry and does not need to be input.
Enter the state name in the box next to State. This is an optional entry and does not need to be input.
Enter the country name in the box next to Country. This is an optional entry and does not need to be input.
Enter the service company name in the box next to Service Comp.. This is an optional entry and does not need to be input.
Enter the date in the box next to Date. This is an optional entry and does not need to be input.
Enter a well identification in the box next to Well ID. This is an optional entry and does not need to be input.
Enter the API number in the box next to API Number. This is an optional entry and does not need to be input.
Enter the latitude value in the box next to Latitude. This is an optional entry and does not need to be input.
Enter the longitude value in the box next to Longitude. This is an optional entry and does not need to be input.
Enter any miscellaneous comments in the boxes next to Misc 1, Misc 2, Misc 3, and Misc 4. These are optional entries and do not need to be input.
Click OK to create the LAS file with the selected options. Click Cancel to not export the file and return to the view window.
See Also