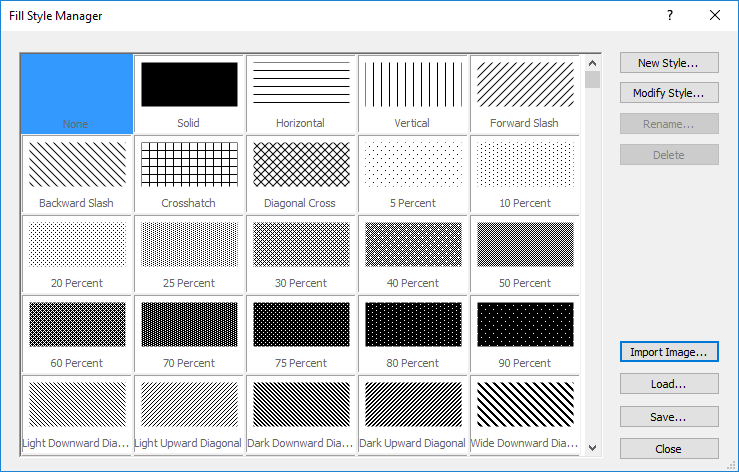
Add, remove, and modify custom fill styles in the Fill Style Manager. Click the Home | Display | Fill Style Manager command to open the Fill Style Manager. Predefined fill styles (Windows stock fills, image fills, and gradient fills) are displayed first in the Styles List followed by user-created fill styles. Predefined fill style names are displayed with gray text and cannot be renamed or deleted. Custom fill style names are displayed with black text. Fill styles cannot be overwritten. However they can be used as a basis for a new fill style by clicking Modify Style.
Custom fill styles are added to the Golden Software Shared appdata folder, C:\Users\<username>\AppData\Roaming\Golden Software\Shared\Styles\Fill by default. Custom fill styles can be loaded and saved to share fill styles between computers.
Custom fill styles that are used in a project are embedded in the SDG file. It is not necessary to send the custom fill style .gsstyle file when sharing Strater project SDG files with colleagues, clients, or other Strater users. However if you wish to share fill styles that are not saved in a project with other users or machines, use Load and Save in the Fill Style Manager to share custom fill styles.
Create, modify, remove, import, and export fill styles with the Fill Style Manager.
The Fill Style Manager displays all of the predefined and custom fill styles in the Styles List. The Styles List is ordered by once by group and once alphabetically. Windows stock fill styles are displayed at the top of the list. The next group includes the default image fill styles. Finally the default gradient fill styles are listed. Then all the styles are repeated in an alphabetic list. The alphabetic list includes custom fill styles. Custom fill styles are at the end of the list when they are created and remain at the end of the list until Strater is closed. Once a new instance of Strater is started, the new custom fill styles will be in the appropriate location in the alphabetic list. Click a fill style to select it. The selected fill style is indicated with a blue background. The Styles List is also displayed in the Fill Palette when the Style or Pattern property is clicked in the Property Manager or Scheme Editor.
Click New Style to create a new style in the Fill Style Editor. The Fill Style Editor contains a single layer when New Style is clicked. Add layers to the style, specify a Name, and click OK in the Fill Style Editor to create a custom fill style. Fill styles cannot be overwritten. Therefore the Name must be unique.
When the Fill Style Editor is
opened via the  button in the Property
Manager, the Name field
is replaced by the Save to Style
List button. Click the Save to
Style List button to add the style to the fill palette. The new
style will be visible in the Fill Style
Manager the next time it is opened with the Home
| Display | Fill Style Manager command.
button in the Property
Manager, the Name field
is replaced by the Save to Style
List button. Click the Save to
Style List button to add the style to the fill palette. The new
style will be visible in the Fill Style
Manager the next time it is opened with the Home
| Display | Fill Style Manager command.
Click Modify Style to create a new style in the Fill Style Editor. When Modify Style is clicked, the selected fill style's layers are automatically added to the Fill Style Editor. The layers can be modified or removed, and new layers can be added. Make the desired adjustments to the layers, specify a Name, and click OK in the Fill Style Editor to create a new style from an existing style. Fill styles cannot be overwritten. Therefore the Name must be unique.
The default Name for the modified style is the existing style's name with a number appended at the end. For example if the Solid style is modified, the default name is for the new style is Solid 1. Then if Solid is modified for a second time, the default name for the new style is Solid 2. If the new Solid 1 style is modified, the default name for the new style is Solid 1 1. Notice that when modifying an existing style multiple times the number increments (1, 2, etc.), and when modifying new styles more numbers are appended.
Rename a custom fill style by selecting the fill style and clicking Rename. Enter a new name for the custom fill style in the Style Name dialog. Default fill styles cannot be renamed. Rename is disabled when a default fill style is selected.
Delete a custom fill style by selecting the fill style and clicking Delete. Deleting a fill style cannot be undone. Default fill styles cannot be deleted. Delete is disabled when a default fill style is selected.
Multiple image files can be converted to a single .GSSTYLE file by clicking the Import Image button. Saving multiple images to a single .GSSTYLE file has a two main advantages:
Simultaneously add many image fill styles instead of adding each custom image fill manually.
Easily share multiple image fill styles with other Strater users.
To convert image files to a single .GSSTYLE file,
The .GSSTYLE file is created. If you clicked No in step 6 above and wish to add the images as fill styles at a later time, click the Load button to import the .GSSTYLE file.
Click Load to import a custom fill style in the .GSSTYLE file format. Select a .GSSTYLE file in the Open dialog and click Open to add the style to the Fill Style Manager.
Click Save to save the selected fill style to a .GSSTYLE file. Default and custom fill styles can be exported. To export a fill style,
Exported fill styles can be shared among computers and users by importing the fill style by clicking Load in the Fill Style Manager.
Click Close to close the Fill Style Manager.
See Also